Cornice Buyer Guide
What is a Cornice?
A ceiling cornice is typically a moulding that can be decorative or plain. It serves both an aesthetic and functional purpose and can be seen in residential and commercial architecture.
Mouldings are bought in uniform pieces that can be laid side by side on the joints of walls and ceilings, and are ideal to hide any imperfections.
Types of Cornice
The origins of the styles of plaster cornice which nowadays is often also known as plaster coving is a fascinating subject and one that we will explore further in this blog as we build up a library of styles.
A cornice can improve the aesthetics of the ceiling as the mouldings can be shaped and coloured to suit any kind of décor.
The ‘right size’ of the cornice is subjective, however we feel that the size and height of your room should be considered.
Cornices also form a part of the aesthetic design which might involve a simple or complex design with multiple levels.
Cornices can conform to design attributes; ‘period style’ for buildings with traditional or classical attributes and ‘simple and sleeker’ for modern buildings.
Plaster Cornice
Adding plaster cornice, coving or ceiling moulding can completely transform the feel and look of a living space by adding depth and texture.
Not only can they elevate your home decor, they could also add value to your property.
We stock many different coving designs, providing our clients with the best options of size and price.
The cost of the cornice depends on the complexity of the design, prices start from £6.28 up to £28.12 per metre.

Victorian Cornice
We have a collection of Victorian plaster coving / cornices which are the definition of elegance and would suit a range of rooms and home styles.
Victorian cornices are arguably some of the most popular designs that we have and are available in sizes from 50mm to 235mm with classic plain cornice & ogee coving in high demand.
No matter the age of the property, Victorian or modern... these decorative designs add finesse to any room (kitchen dining area / bedrooms / lounge areas etc).
Prices range from £6.28 up to £28.12 per metre.

Edwardian Cornice
Create an authentic interior within your period property with the addition of our Edwardian coving.
Our selection of period coving designs stay true to the era and would look equally beautiful in a modern home.
Our cornices accommodate all design aspirations, whether you want a traditional Edwardian coving design or a simpler look. We have various styles available in sizes from 50mm to 235mm.
Prices can range from £6.28 up to £28.12 per metre.
A popular choice is our dentil plaster cornice featuring an ogee curve running above a classic dentil moulding.
This is an example of the quintessential sophistication of the Victorian and Edwardian ages, making it easy to blend in with any type of décor and appear like an original feature.

Georgian Cornice
Georgian architecture - are named for the reigns of the first four King Georges of England.
These graciously proportioned classical buildings are marked by an understated elegance.
Georgian buildings are sought after and loved by the British, and we have a carefully curated selection of mouldings that complement buildings of this period.
Georgian coving and cornice was typically decorative and ornate.
We stock a fine range of Georgian plaster coving and cornice styles that reflect the spirit of the period, with a larger drop than projection and in addition feature neoclassical designs like Acanthus Leaf, Ogee, Dentil and Egg & Dart.
If you want to recreate the Georgian grandeur, check out our small, medium and large ranges, we have a great choice of profiles and price options for you.
Drops range from 50mm to 235mm. Prices range from £7.80 to £23.45 (per metre)
Cornice Materials
Our plaster coving & cornice are all handmade using traditional methods with the finest gypsum. We pride ourselves on using the highest of quality.
Traditional, heavier designs can now be replicated fairly easily with gypsum, which makes transportation and especially installation far easier.
We have coving to suit every type of home from the grandest Victorian property to a minimalist style loft apartment.
Our coving designs and cornices are lightweight, hard wearing and can be delivered straight to your door. Samples are available.
Our fantastic choice of styles are easy to install and give your interior that finished design detail.
Coving and cornice can be installed by a professional or as a DIY project, depending on your skill level.
If you need any advice when choosing one of our products or would like additional information, please don’t hesitate to contact us.

Different finish types could be needed for various rooms. To emphasise the function of the room effectively, selecting the appropriate coving and ornamental accents is crucial.
You might want to make the living room bigger and add something simple, whilst your bedroom or hallway might benefit from having more intricate features. Fortunately, you have a wide range of options to choose from.
Kitchen Cornice
Consider if the style of the kitchen in which you are mounting the coving is modern or classic style. Look at your unit design and judge if the coving should be simple or elaborate, modern or traditional.
The last thing you want to do is spend money on something that won’t look right.
You may wish to match your coving and skirting, this can make a room feel quite opulent.
Blending the wall with both the floor and the ceiling with the right designer panels can make a lot of difference in the visual size of the room as well as introduce a brilliant designer element.
We offer a range of skirting that matches our coving and cornice designs for the true unity of design of your interior.

Bathroom Cornice
A great bathroom design may provide you with an effective way to meet your daily needs as well as a relaxing place to unwind after a long day.
One way to create a spa-like setting and ambience in your house is by including bathroom ceiling coving design elements and ambient lighting.
The effect is not only one of luxury, but also naturalness and style.

Bedroom Cornice
Whether you’re working with a new build or transforming an existing room, our coving will add instant style, it’s the secret to adding luxury and elegance to your home.
When selecting bedroom coving it is of utmost importance to consider the overall interior of the room.

How to Measure Cornice
Some key steps:
- Choose the shortest wall with two internal mitres - cut a piece of cornice to this length.
- When you find where the cornice sits, make marks on the top and the bottom.
- Measure down (the depth and across), known as the projection.
- You now have the projection for mitres and the depth to mark all the way around the room (in every corner).
- For walls where it’s over a full length of cornice, it’s advisable to use a chalk line to snap the line.
- Have a partner go down the end of the room so you can see the depth mark, snapping the line to ensure that it is ready for your coving installation
Check out our measuring video to learn more on how to measure Cornice for your home.
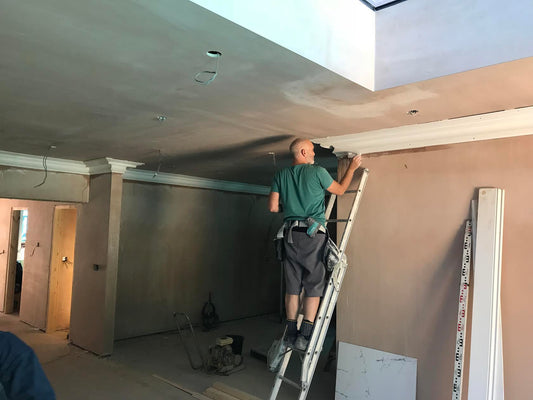
How to Install & Fit Cornice
We offer a coving installation service covering most of the UK. We have a network of recommended coving installers, who can provide an expert reasonably priced coving fitting service.
Alternatively below we set out a series of guidelines and tips for DIY coving installation
Stage 1: Marking the Position of the Coving
- Your first task is to identify ceiling height variation, to ensure that the finished coving will be level throughout the room.
- Cut a small piece of coving around 12 inches long to use as a guide.
- Place this piece of coving up to the wall and ceiling. With a pencil, mark a line where the edges of the coving meet the ceiling and the wall and work your way around the room marking the wall and the ceiling at suitable intervals.
- With a straight edge or chalk line, join up the marks giving you a line around the edge of the ceiling and a line around the top of the wall. If the line on the wall is not level then importantly you have identified areas where the height of the ceiling varies.
- To compensate for the anomalies in ceiling height, mark on the wall a level line from the lowest point found and extend this new line around the room around the room at the same level.
- It is always better to fill a gap between the top of the coving and the ceiling, as this will result in a more professional finish. • Remember never try to follow the contours of an uneven ceiling with your coving.
Stage 2: Preparation of the Wall/Ceiling Surfaces
To ensure that your coving adhesive bonds securely to the wall, ceiling and coving surfaces:
- Remove any wallpaper that lies between the lines drawn in STAGE ONE.
- Scrape any paint off.
- With a sharp knife or scraper score the wall in a crisscross pattern, this will allow the coving adhesive to get a firm key with the wall. • Cover the hatched surface with the bonding agent (diluted to manufacturers recommendation) and allow to dry.
- Alternatively if you want to skip this preparation stage you can countersink srews into the cornice which will secure the cornice while the adhesive sets (see How to install plaster coving video, for a demonstration of this method). You have completed the preparatory work.
Stage 3: Fixing the Plaster Coving Into Position
Plaster coving is fragile and can snap under its own weight if not handled properly; if you have not handled coving before then you will find it easier to have someone to help you, especially when handling larger pieces of coving.
- The best place to begin fixing your coving is in the first corner that you see when you come into the room (beginning in any external corners such as a chimney breast if applicable). This area will be the most noticeable section of coving when you have completed the job and it is easier to get this first corner right so you should start to fix your coving from here.
- We recommend that you always use the longest pieces of coving that are practically possible, to avoid unnecessary joints; the fewer the joints the neater the overall finish, and is worth having some off cuts left over at the end to get the best finish.
- If you have not fitted coving before it is quite easy to cut the wrong angle; to avoid this potential problem, it is worth practising cutting the angles on a piece of scrap/waste coving and then in pencil, mark the true angle of the cut and the approximate position on the pieces of coving you are proposing to fit in advance of actually cutting the coving.
- It is easy to cut an internal rather than an external angle until you get used to it. (See videos of how to cut an internal & external mitre for a demonstration without the use of a mitrebox). Alternatively use an adjustable mitre box to cut your angles.
- When you make this/set it up, ensure that the other end of your length of coving is supported at the same height as the coving in the mitre box, so it lies perfectly straight and level.
- Use a fine or medium toothed cross-cut wood saw for cutting coving (the stiffer the blade the better to ensure a straighter cut).
- When you have cut the coving for your first corner, place the pieces up to the wall to check the join, (it is unlikely your walls will be exactly 90 degrees so you will have to fill any gaps at the joint. (Watch video of how to fill a mitre). Cover the edges of the coving with bonding agent and allow to dry. https://www.plasterceilingroses.com/pages/installation-guides-how-to-fill-a-mitre-joint
- Before you begin to prepare the adhesive, first tap in some small nails along the wall drawn pencil positional guideline (produced in STAGE ONE) which will serve to support the weight of the coving while you fit it and to also hold the coving in position while it dries (if you choose not to screw the cornice in place).
- For larger coving and cornice, you can also put some pins into the ceiling to stop the coving pulling away from the ceiling under its own weight, before the coving adhesive dries.
- Now prepare the adhesive (if you are mixing your own adhesive, be sure to use a clean bucket and clean water).
- Spread the coving adhesive along the back of the coving at the top and the bottom, where it will be in contact with the wall and ceiling.
- Now push the coving firmly into position checking that the foot of the coving is butting up to the nails applied along the pencil positional guideline drawn on the wall.
- Use a pallet knife to scrape off the excess coving adhesive from the top and bottom of the coving and finally, with a wet sponge, wipe over the joint. • Remove the nails after 2 or 3 hours and fill the holes; casting plaster preferably or coving adhesive if neccessary can be used to fill all the joints. • Finally to finish your coving we recommend painting with two coats of matt emulsion watering down the first coat.
Alternatively we can also offer a coving installation service covering most of the country.
We specialise in fitting coving in London and the South East where we have many customers.
Watch our video on how to plan your coving job for more information
Benefits of Installing Cornice
Whatever style you’re aiming for, whether it’s traditional (Victorian, Edwardian, Georgian, Art Deco) or something more contemporary, decorative coving / cornice is very effective for creating character and enhancing an interior design theme.
Additionally, because we have so many different kinds of cornices, whether simple or decorative, there is certain to be something to suit all tastes, but what are the benefits?
Conceals Imperfections
Our collection of ceiling coving will perfectly cover any wall imperfections whilst adding elegance to your room’s decor.
Plaster coving can conceal imperfections like cracks and make the ceiling appear taller.
With diverse styles and designs, it’s easy to find the coving that perfectly complements your room.
Cornice are ideal to hide messy wires or cables that could be seen on walls or ceilings.
The hollow space within the coving can discreetly route wiring for lighting or home entertainment systems without compromising the room’s aesthetics.
Increases Property Value
Installing an impressive cornice is a great way of taking a bare and uninteresting room into a visually stimulating place, which as an added bonus will add value to your property.
Modern homes have come a long way in terms of design and functionality, homeowners can now enjoy an array of cornices that were once thought of as exclusive to traditional homes.
Coving is a timeless and elegant decorative touch that can add character and sophistication.
Whether you choose a traditional or contemporary style, coving is an investment that will not only enhance the look of an interior but also increase the value of your property.
Durability
Coving & cornice is perfect for adding interest to the tops of walls, giving them a stylish and elegant finishing touch to really set off a room.
It also avoids the décor looking unfinished and as if there is something missing in the detail of the room.
Gypsum coving and cornices can absorb any paint and the majority of finishes, won’t shrink, distort, burn, or emit poisonous fumes, and won’t be eaten by insects or animals.
Our coving is recommended for both residential and commercial interiors.
How much is Cornice per Metre?
Coving can uplift any interior, but you might be surprised by the cost. Our coving is available in Metre lengths.
Depending on the type that you select for your room, coving can be as inexpensive as just £7 pounds per meter.
It is significantly more expensive if you decide to use elaborate pieces, however beautiful results can really be accomplished on a reasonable budget.
If you need any help or advice regarding plaster coving please send us an email or an online chat or call 0333 043 1471.
-
Need help?
View articles and videos designed to help you make the right choices when purchasing and installing products from Plaster Ceiling Roses.
-
Help Guides