By understanding the most effective way to paint coving, the job can be done easily and efficiently by even the most amateur DIY enthusiast.
Before painting your coving a ‘mist coat’ is required. A ‘mist coat’ is a watered down coat of paint which is applied to fresh, dried, new plaster before you apply a standard coat of paint.
Our gypsum coving has a permeable surface (which means it will soak up moisture very quickly). It’s imperative to water down your first coat, (creating a ‘mist coat’), this will help the plaster to soak up the paint and create an excellent bond.
Without the ‘mist coat’ you’re likely to have poor adhesion between your paint and coving, this could crack, flake or even peel off. Adding water to the first coat helps the plaster to really bond to the paint as it’s able to soak it up due to the paint being thinner.

Where can you Paint Coving?
After installation, we highly recommend painting your coving (don’t forget it’s advisable to wait at least 24 hours after installing). You can paint coving in any area of your home.
Painting enhances the coving and is the perfect way of adding a touch of elegance and sophistication. Cornices and ceilings and have often been overlooked when it comes to decorating a room and are often the last thing on the list of things to get a new coat of paint.
But with the rise of the new social media trend, coving is getting a fresh coat of paint and we are seeing them painted in eye-catching colours.
You may choose to paint your coving to match the ceiling or use a contrasting hue to form a contrasting boarder, unify two colours. There are so many choices!
What’s the best Paint to use for Coving?
We recommend painting with two coats of matt emulsion, ensuring the first coat is a ‘mist coat’.
Look for a high-quality, water-based paint with a semi-gloss or satin finish. These types of paint provide a smooth and durable finish that can withstand the test of time.
Additionally, using a paint with good coverage and adhesion properties will help ensure that the coving is evenly and effectively coated.
Remember to properly prepare the surface and apply thin coats for the best results. We personally suggest to our customers that they use a high quality paint such as ‘Farrow and Ball’, 'Lick', 'Coat', 'Little Greene' when it comes to painting coving as it gives a luxurious finish.

What Colour to Paint Coving?
Whether you like to stick to tradition or make a statement, there are endless design opportunities when it comes to adding colour to your cornice.
Your choice of colour is purely subjective and based on your personal preferences, however, it is generally recommended to select a colour that ties in appropriately with the appearance of your room.
This can help create a more classy and polished look. Whether you prefer a subtle and neutral shade or a bold and contrasting, the goal is to achieve a cohesive and elegant aesthetic.
A question we are often asked regarding painting coving is whether to use emulsion or gloss. While high sheen paint finishes like satin and gloss are used on interior trim and detailing, this is usually interior wood and metal.
When it comes to coving emulsion paints are best, which are water-based paints that are used on interior walls & ceilings in matt, eggshell, silk or soft sheen finishes, depending on the finish of the room.
- Matte – Popular and fashionable for interiors since it provides a flat, smooth finish with less light reflection
- Eggshell – Gives you more light reflectance than matte, giving you a glossy finish as opposed to a flat surface. Eggshell is also better at resisting stains than matte.
- Soft sheen & silky – Offers a silk and mid-sheen finish. Soft & silky is easy to clean and long lasting.
Painting the coving and ceiling the same colour gives the impression of a slightly lower ceiling; painting moulding and walls in the same colour, by contrast, has the opposite effect and making the walls appear taller.
Adding accent colour to your coving will create a border between the wall and ceiling. If you have a minimalist décor throughout your bedroom, a touch of colour will add dimension.
How to Paint Coving - Step by Step
It is important to begin by properly preparing the coving, ensuring it is completely devoid of any adhesive clumps / dust. Proceed by applying a ‘mist coat’ to the coving, allowing it to thoroughly dry.
Once this has dried, you may proceed with the application of your chosen paint colour. A sash brush, also known as a rounded paint brush, is a great choice for painting coving because the bristles naturally bend to curves.
Alternatively, you can use an angled brush, or any small brush from 1.5” to 4”. Regardless of which brush you choose, make sure you get a quality one.
Applying light, even coats, waiting for each one to completely dry before adding another is essential. A polished and expert-looking finish can be attained by taking your time.
Here is a step-by-step guide that will help you achieve beautifully painted coving without the stress.
• Cover your floor, move your furniture and cover everything you don’t want painted in a dust sheet.
• Apply masking tape or masking film around the coving and on the ceiling just above the length of the coving to avoid paint mismatches.
• Use a medium sized paint brush, dip your brush into your paint, avoiding spillage and splashes. Apply the paint gradually, starting with small sections.
If you’ve got masking tape, you can start at the edges and work inwards, but if you’re going free hand, we’d recommend starting an inch away from the corners, working your way towards the edges.
• For traditional cornices with high relief detailing, a smaller brush would be useful as you want to dab the brush into the crevices.
• Once you’ve applied one layer of paint, leave it to completely dry before applying your second coat.
• When your paint has dried, inspect your work, then apply the second thicker coat. Make sure you apply this coat evenly for a smooth finish. Leave this coat to dry completely.
Coving tends to need approximately 1 to 3 coats of paint for that beautiful smooth finish. However you may be happy with the results after 2 coats.
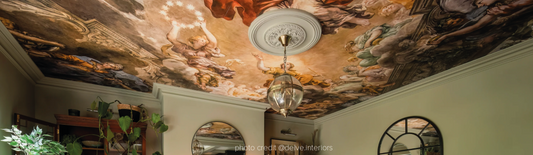
Our selection of cornices, whether they are sleek and smooth or traditional and intricate, look amazing with a coat of paint.