-
Choose cornice that you like:
You are paying for the coving and ultimately you will be living with your choice so always choose cornice that you actually like.
-
Consider your ceiling height:
Rule of thumb: The higher the ceiling in a room the bigger the cornice you can use. Large cornice used in a room with low ceilings will create an out of proportion effect and appear to shrink the room.
As a general guideline:
200mm coving (8 inch) is used when the ceilings are 4.3 metres (14 foot) or higher.
90mm - 120mm (3.5 – 5 inch) when the ceilings are above 2.75 metres (nine foot).
50mm – 70mm (2 – 2.75 inch) coving for ceilings lower then 2.75 metres. Smaller coving is also suitable for rooms with tall units like for example kitchens or bathrooms.
-
Size up the coving properly:
There are three measurements to understand when buying cornice:
Firstly the Drop (depth) from the ceiling down the wall, secondly the Projection from the wall across the ceiling and finally the Width (diagonal) across the face of the coving.
Coving is sold by the Drop size but a common mistake some customers make is to think in terms of the Width because that is how DIY superstores sell the cheap paper faced coving.
If for example you want 200mm (eight inch) coving in width you’ll actually need to be looking for a design with roughly a 150mm Drop and Projection. The most popular sizes of plaster coving that we sell have a drop between 90mm and 120mm.
-
Think about whether you want the cornice to standout, or to blend in:
Traditionally large dramatic cornice was used in the main reception rooms to impress visitors while in the bedrooms it became less prominent.
Are you trying to make a statement with your cornice or will it be an integral but unobtrusive feature of your overall decorative scheme? Understand your vision for your room(s) before you start seriously shopping for coving.
-
Make sure you are ordering enough coving to finish the job properly:
If you measure your room and order the exact amount of coving it will probably leave you with a wall full of off cuts at best, and at worst several lengths short. The latter case will result in the extra expense of paying for another delivery in addition to rebooking tradesmen to fit a tiny amount of plaster coving and most coving suppliers won’t sell you only one or two lengths, many have minimum order sizes.
Rule of thumb:
After measuring up your project allow an extra 20% for wastage, mitring and to produce the best finish possible.
It is usually necessary to throw short off cuts away to get a professional looking finish. Best get your order right first time. It is a false economy to scrimp on the amount you need.
-
Plan your job using whole lengths of cornice, shop for it by the metre inc VAT:
The fewer joins needed to complete the cornicing in a room the better the overall effect will be, so plan your project in term of how many full lengths you’ll need to use.
When you're shopping around on the Internet though it soon becomes clear that each company sells their plaster cornice in different lengths and with some sites, pricing is also very opaque. The best way to shop for plaster coving is by looking for how much it costs per metre and make sure you know that the price includes VAT. Pricing should be transparent; be suspicious if it isn't.
-
Order a sample:
Buying plaster coving on the Internet can be quite confusing and it is time consuming. Often it’s difficult comparing products from different web sites. With a sample in your hands though you’ll know exactly what you’re buying; its size, quality and how it will look in situ. Importantly you can also show the sample to your fitter and then everyone knows what they’re dealing with.
-
Choose your coving fitter carefully:
Fitting fibrous plaster cornice is a skilled job and not all builders or plasterers are experienced enough to do it properly. Usually everyone can fit the paper faced coving sold in the DIY superstores but fitting Fibrous plaster coving requires more skill. A tradesman who specialises in fitting this type of coving is known colloquially as a “Fibre hand”.
Make sure that your chosen coving installer is aware of what you are asking them to quote for and fit. They can not fit Fibrous plaster coving for the same price as Gyproc/Knauf coving. if you have a quote for fitting the coving that is less than the cost of the coving, it is almost certain that your workmen do not understand what they are fitting.
-
The coving you buy is not the finished product:
The coving you get delivered whether wet or dry is not the finished decorated product. It will need to be trimmed, internal and external corners need to be mitred and it will need to be attached to the wall with adhesive, screws and held in place with pins while the adhesive goes off. Once up and in place the next job is to fill with casting plaster to produce an organic smooth plaster surface.
A skilled fitter will spend 33% of their time cutting mitres and fixing the coving in position and then spend the rest of the time filling the joints and achieving a professional organic surface that is ready for decorating.
-
Choose a timeless design:
Either chose a plain style of plaster cornice or a design that has stood the test of time and both will look elegant and classy in 20 years time. If a cornice style like Egg and Dart is still popular after 4000 years it will not look dated. These designs are the epitome of classic style.
Know which way round the coving should classically be fitted, and then decide if you want to defy convention. Remember that some styles like Ogee, are reversible anyway.
-
Consider the period of the building, but don’t over analyse it:
There is a tendency to assume that old houses must be restored exactly to their former state, which is likely to be somewhat true if it is Grade 1 listed building. However the majority of period homes are free of such restrictions.
The template of for example a Victorian house, is far more idiosyncratic than is often assumed. There are many styles that make up the Victorian look. Victorian houses were constructed by small independent speculative builders who simply chose fittings and styles they thought would look good and would sell well.
In addition it’s also worth remembering that the original condition is not always better. The Mews house illustrates this point perfectly. Nowadays it is regarded as a luxury property and is decorated accordingly. No one seriously buys a Mews house and thinks it should be restored to its original state; a stable and home for servants!
Classical designs do look good in period properties but to replace the coving exactly as it was will not only be very expensive it is usually unnecessary. In the majority of cases a period house is a home for the 21st century not a monument or a museum.
-
If you’re serious about your coving choose plaster over plastic every time:
Ask any good builder what you should fit and he’ll tell you plaster coving.
Plastic is an inferior product.Nowadays plastic coving is often more expensive than plaster coving. Plastic warps and ages overtime whereas plaster does not. A skilled craftsman can create a much better finish in plaster. Plaster coving is not flammable.
Plaster coving will add value to your property and not be regarded as something that will need stripping out or covering in future.
“Ceilings must always be considered. They are the most neglected space in a room.” Albert Hadley US interior designer. Consider cornice and a ceiling rose to add interest to an otherwise barren space.
Latest news
View all-
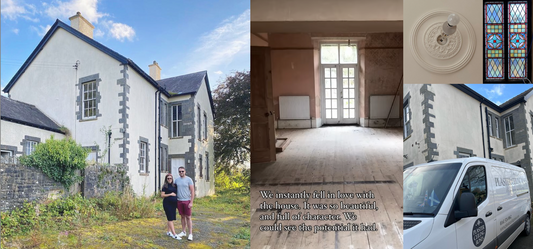
A 1890s Welsh Victorian Vicarage Renovation
“There is a house built of stone... This is a place where I feel at home” How many of us dream of taking on a Victorian property renovation? Social...
A 1890s Welsh Victorian Vicarage Renovation
“There is a house built of stone... This is a place where I feel at home” How many of us dream of taking on a Victorian property renovation? Social...
-
Give your modern property classic credentials
Adding character and period features to a new build property could be the best of both worlds. You’ll benefit from the efficiency of a modern property whilst potentially increasing the...
Give your modern property classic credentials
Adding character and period features to a new build property could be the best of both worlds. You’ll benefit from the efficiency of a modern property whilst potentially increasing the...
-

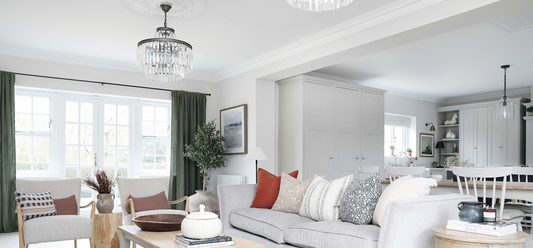
Prepared to be wowed with our ceiling coving!
Last Summer we were proud to be part of the highly acclaimed interior event of the season, Wow! House 2023. WOW!house is a unique 500 sq m showhouse, built within...
Prepared to be wowed with our ceiling coving!
Last Summer we were proud to be part of the highly acclaimed interior event of the season, Wow! House 2023. WOW!house is a unique 500 sq m showhouse, built within...


